http://goo.gl/Tsu0RB The Best Android Blog For Rooted Android Users. You will be seeing many root apps Custom ROMs, recoveries etc. Please support me.
Friday, 22 January 2016
Tuesday, 5 January 2016
How to Get Chat Heads in WhatsApp | Enable Chat Heads | Guide by Geeky A...
Link to Video: https://youtu.be/wtZoFLzgkKQ
Subscribe to my channel: goo.gl/Tsu0RB
Monday, 21 December 2015
[Stable]Install Android 5.1 L CyanogenMod 12.1 on Xiaomi Redmi 2 | Guide...
Subscribe to my channel: http://goo.gl/Tsu0RB
Thursday, 17 December 2015
Root any Android Device Running on Android L 5.x | Install SuperSU | Gui...
Subscribe to my channel: goo.gl/Tsu0RB
Monday, 14 December 2015
Install Android 6.0 M CyanogenMod 13 on Xiaomi Redmi 2 | Guide by Geeky ...
Subscribe to my Channel: goo.gl/Tsu0RB
Thursday, 10 December 2015
Wednesday, 2 December 2015
Root any Android Device Running on Android Marshmallow 6.0 | Guide by Ge...
Please Subscribe to my channel also: https://youtu.be/JNI77zNG8OI
Monday, 30 November 2015
Install Android 6.0 CyanogenMod 13 on Xiaomi Redmi 1S | Guide by Geeky A...
Subscribe to my channel, like my videos and share them...
goo.gl/Tsu0RB
Monday, 19 October 2015
Don't Swipe Xposed Module | Stop Snooping Individuals from Swiping through your Photos and Videos.| Lock Images in Gallery from Swiping | Xposed Modules by Geeky Android Tips
Hi guys this Shubham aka ThunderBolt. All of us have many friends and we usually give our phones to them just for 1-2 mins to show a image or a video, but some of them are real pain in the a** who start to swipe among our private images after viewing that image or video. Just to stop these kind of people, a developer named "iHelp101" has created a Xposed Module titled "Don't Swipe", which as the name tells, prevents other from swiping through your images and videos. What this app does is that, when you lock a image, and a person tries to swipe, the gallery will automatically crash. And today I'm going to show you how to use it.

So first of all you need to download Don't Swipe, install it and enable it in Xposed Installer. After that head to the app and select the thing to happen when swipes your image. After that go to gallery and open that image which you want to show to others and press menu button and then lock the photo from the over-flow menu. And viola, now nobody will be able to swipe through your images.


You can also download Don't Swipe from my post:
Download Don't Swipe APK
Well that's it for today guys, hope you like my posts.
Feel free to leave questions and suggestions in the comments section.
ALSO CHECK OUT MY YOUTUBE CHANNEL:
goo.gl/AEnici
Peace !


You can also download Don't Swipe from my post:
Download Don't Swipe APK
Well that's it for today guys, hope you like my posts.
Feel free to leave questions and suggestions in the comments section.
ALSO CHECK OUT MY YOUTUBE CHANNEL:
goo.gl/AEnici
Peace !
Sunday, 18 October 2015
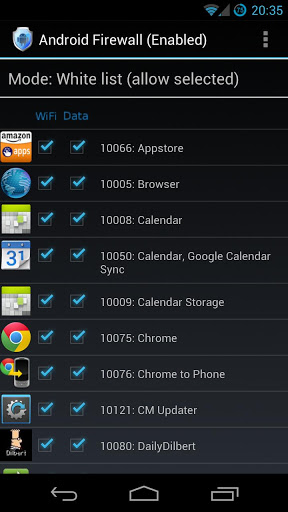
Firewall for Android | Restrict Internet Access from Apps | Windows Firewall Alternative for Android | Android Firewall *root* APK | Guide by Geeky Android Tips
Hi guys this Shubham aka ThunderBolt. All of us who use Internet on our Windows PCs will probably have paid attention to the Firewall. And if you don't know what in the name of God is Firewall, let me tell you in short. Firewall is basically a software from which you can either allow or deny internet access to apps. For example, if an application is using huge amounts of data in the background, and you don't want to close it, then you can turn off its internet access from the Firewall. And now that firewall feature can also be used on Android devices using root. Yup, that's right, this can be done using a root app called Android Firewall, which has a very suitable title.

Android Firewall works after you grant it root access, just like Windows Firewall where you have to grant it administrator access. After giving root access you can either add apps to the blacklist or the whitelist. You can also restrict an app from a single type of network like WiFi, Data, VPN, etc. This app also has multiple profiles. After setting up the firewall press the menu button and select 'Enable Firewall', and viola you have a working Firewall.


You can also download its APK from my post:
Download Android Firewall APK
Well that's it for today guys, hope you like my posts.
Feel free to leave questions and suggestions in the comments section.
ALSO CHECK OUT MY YOUTUBE CHANNEL:
goo.gl/Tsu0RB
Peace !
Android Firewall works after you grant it root access, just like Windows Firewall where you have to grant it administrator access. After giving root access you can either add apps to the blacklist or the whitelist. You can also restrict an app from a single type of network like WiFi, Data, VPN, etc. This app also has multiple profiles. After setting up the firewall press the menu button and select 'Enable Firewall', and viola you have a working Firewall.

You can also download its APK from my post:
Download Android Firewall APK
Well that's it for today guys, hope you like my posts.
Feel free to leave questions and suggestions in the comments section.
ALSO CHECK OUT MY YOUTUBE CHANNEL:
goo.gl/Tsu0RB
Peace !
Custom Text Xposed Module | Modify any Text on your Device | Replace Text with any Text anywhere on your Device using this Module | Custom Text APK | Xposed Modules by Geeky Android Tips
Hi guys this is Shubham aka ThunderBolt. Are you feeling irritated due to some stupid text written in so many different apps of your phone, and you wish if somehow it could be possible to change it, then man, your wish has come true as a developer named "liubaoyua" has created a Xposed module named "Custom Text" which lets you, as the name suggests, change any text on your device using Xposed Framework and root access.

The module is very easy to use and it can edit texts of all apps including system apps. To use it, first you need to enter the original text in it and then enter the text with which you want to replace the original text. This module can also make universal changes to your phone, i.e. it will replace a text throughout your phone. Custom Text also lets you backup and restore your settings i.e. the changes that you made to your apps. However the app requires root access so that it force closes the app, of which you changed the text, so that the changes you made can be saved.


You can also download the module from this post from the link given below:
Download Custom Text APK
Well that's it for today guys, hope you like my posts.
Feel free to leave questions and suggestions in the comments section.
ALSO CHECK OUT MY YOUTUBE CHANNEL:
goo.gl/Tsu0RB
Peace !
Friday, 16 October 2015
Airdroid- Android on PC | Use your Android through PC | Android on PC | Nokia PC Suite Alternative for Android | Manage Android Wirelessly throughout the World using PC | Airdroid APK | App Review by Geeky Android Tips
Hi guys this is Shubham aka ThunderBolt. When Nokia phones were popular, people would use the Nokia PC Suite to manage their device and use it using the PC. And now after changing our device from Nokia to Android, we still crave for that Nokia PC Suite. Well guys, now there is an alternative for that Nokia PC suite, called Airdroid. Airdroid is an app which wirelessly connects your device to your PC to use the device.

Airdroid can connect to your PC using Wifi Hotspot, USB Tethring or an internet connection(using an airdroid account anywhere in the world). After connecting the device you can manage your apps, files, place calls, send messages, view photos and videos, get notifications on PC, use the cameras, listen to songs, transfer files between the PC and the device, and two root features which are taking screenshots and screen casting your device on the PC i.e. viewing what is going on your android screen. Thus we can say that Airdroid is a very nice and free alternative for Nokia PC Suite which works well with Android devices.


You can also download Airdroid APK from this post.
Download AirDroid APK
Well that's it for today guys, hope you like my posts.
Feel free to leave questions and suggestions in the comments section.
ALSO CHECK OUT MY YOUTUBE CHANNEL:
goo.gl/Tsu0RB
Peace !
Advanced Download Manager for Android | IDM Alternative for Android | Best Downloader App for Android | ADM Advanced Download Manager APK | App Review by Geeky Android Tips
Hi guys this is Shubham aka ThunderBolt. Many of us who use internet on Windows will probably know about IDM i.e. Internet Download Manager. It's a very nice downloader which has many features. And there is IDM alternative available on android named ADM, which stands for Advanced Downloader Manager.

The app, as the name suggests, is a file downloader using http and https links. Just like IDM, ADM also has multiple features. So, first of all just like IDM, this also download files in multiple parts ranging from 1 to 9. It also automatically resumes the download, if some error occurs and also lets you define the maximum download speed as well as the number of active downloads. You can also choose your user agent for downloading like chrome, opera, safari etc. The app also shows an ongoing notification for the active downloads. Other than that you can also plan your downloads in this app which includes starting time, turning Wifi on or off, closing the app, and many other things can be controlled using the planning section.


You can also enable an top window, which is an over the screen rectangle which shows the downloads. ADM also comes with an inbuilt browser so that if you open a link, and it is not a file link, ADM will not download a php or html, but open that link in its browser, if required. You can also theme the app. In the last I would like to say that ADM is very great All-in-One downloader for android platform which has no competion. You can also download the apk of ADM from this post using the link given here:
Download ADM
Well that's it for today guys, hope you like my posts.
Feel free to leave questions and suggestions in the comments section.
ALSO CHECK OUT MY YOUTUBE CHANNEL:
goo.gl/Tsu0RB
Peace !
Enable QuickBoot in CyanogenMod | Sleep mode for Android | MODs for CyanogenMod | Guide by Geeky Android Tips
Hi guys this Shubham aka ThunderBolt. After the release of Windows 8 for PCs, we have seen that when we put the computer on sleep, it quickly turns off and boots up in mere 3-4 seconds, and when the computer is on sleep it doesn't uses much battery. Well now CyanogenMod has released a new feature which is similar to windows' sleep mode, which is called QuickBoot. Before telling you how to enable it, first let me tell you that it is available for only those devices which have CyanogenMod 11 and up which was updated at least once after the summer of 2015, and it should be running on a Qualcomm or it may won't work properly.

When you have enabled QuickMode on your device, and you power off your device, you will see that the device's screen quickly turns off and the device vibrates, this means that now your phone is under sleep and no apps are running and neither the SIM. Due to this the device will use only a little amount of battery in a period of 7-8 hours. And when you'll turn on device you will see that it turns on under 2 seconds.
Now let's learn to enable on your device. So first download this ZIP file and flash it using some custom recovery:
Download QuickBoot ZIP
After flashing the file go to developer options(check out my other post to enable developer options) and find QuickBoot option and enable. And Viola, you have QuickBoot aka Sleep mode on your android device.

Well that's it for today guys, hope you like my posts.
Feel free to leave questions and suggestions in the comments section.
ALSO CHECK OUT MY YOUTUBE CHANNEL:
goo.gl/Tsu0RB
Peace !
Wednesday, 2 September 2015
[UPDATED] [OFFICIAL] Xposed for Android 5.1.x and 5.0.x Announced [WORKING] | Xposed Framework SDK 22 | Xposed Framework SDK 21 | Xposed Alpha 3.0 v4 APK | Xposed Bridge JAR file| Guide by Geeky Android Tips
TO DOWNLOAD THE LATEST XPOSED
VERSION GO TO THIS LINK
Hi guys this Shubham a.k.a ThunderBolt. If you have a rooted phone you may have probably heard about xposed framework, or you may have even used it, but if you have tried installing xposed in android lollipop, that is, 5.1.x or 5.0.x, then you must have noticed that the Xposed Installer doesn't works, it shows that the SDK of lollipop is not supported. Well guys, today i will be your savior and will show you how to install xposed on your android device. Well first, as you know, you will need a rooted android device to install xposed framework, so continue only if your phone is rooted (see how to root). Now as you have root, you will need three things for installing xposed framework in lollipop:
- Xposed Installer Alpha APP
- Xposed Framework Flashable Framework
- Xposed Bridge API
Now let's come to the installation of Xposed, so first you need the following two files:
- Xposed Framework ZIP ARM SDK 22
- Xposed Framework ZIP ARM SDK 21
- Xposed Framework ZIP ARM 64 SDK 22
- Xposed Framework ZIP ARM 64 SDK 21
- Xposed Framework ZIP x86 SDK 22
- Xposed Framework ZIP x86 SDK 21
- Uninstaller ARM
- Uninstaller ARM 64
- Uninstaller x86
- Xposed Insaller Alpha APK
Well after downloading the required files (that is according to your processor) install the apk, and the reboot to recovery to install the framework zip file to install the framework, now when you'll go into xposed it will show you active bundles and xposed will be working. You can download it from my blog:
Xposed Brigde API JAR
Now after this, in most devices the xposed will not work properly, so you need to download Xposed Bridge and place it in /system/framework folder, to make xposed work properly.
NOTE: After this go to root explorer and long tap on this file, go to permissions, and allow it all permissions by checking all the boxes. You may reflash the zip file for better stability.
Well that's it for today guys, hope you like my posts.
Feel free to leave suggestions and questions in the comments section.
Peace!
Visit my YouTube Channel: https://goo.gl/Tsu0RB
Tuesday, 1 September 2015
Side Loading Apps in Android without PC | How to install APKs in Android Device no root | Guide by Geeky Android Tips
Hi guys this is Shubham aka ThunderBolt. If you're reading this blog you'll probably have an android device , and if you have a \n android device then you'll surely have apps on it. While most of us install these apps from Play Store, there is another way of installing apps, that is sideloading apps. While according to most people, sideloading is done using a PC, but I'm going to teach you how to sideload apps without a PC. Actually it is very easy to sideload appps, we just need the '.apk' files for the app. If you don't know what in the name of hell are .apk files, then don't worry, because I'm going to tell what are these files. Actually these are just like .exe files for installation of applications in Windows.
So, as now we what are .apk files, let's learn how to install them. So first things first. Firstly you obviously need an APK file, after getting it you need a file manager, and if your device doesn't comes preloaded with a explorer, then you can download ES File Explorer from the Play Store, which has all the features needed. After that go to Settings>Security and turn on 'Unknown Sources' option. What it does that, it allows you to install APK files.

Now go to ES File Explorer and tap on any apk file and tap on install.

Tapping on install will open the Package Installer, now this will show the permissions used by the app, now tap on next to install the app.

Well that's it for today guys, hope you like my posts.
Feel free to leave suggestions and questions in the comments my section.
Follow me Google+.
+1'd my blog.
Visit my YouTube Channel: https://goo.gl/Tsu0RB
So, as now we what are .apk files, let's learn how to install them. So first things first. Firstly you obviously need an APK file, after getting it you need a file manager, and if your device doesn't comes preloaded with a explorer, then you can download ES File Explorer from the Play Store, which has all the features needed. After that go to Settings>Security and turn on 'Unknown Sources' option. What it does that, it allows you to install APK files.

Now go to ES File Explorer and tap on any apk file and tap on install.


Well that's it for today guys, hope you like my posts.
Feel free to leave suggestions and questions in the comments my section.
Follow me Google+.
+1'd my blog.
Visit my YouTube Channel: https://goo.gl/Tsu0RB
Sunday, 23 August 2015
Enable Battery Bar [NO ROOT] | MIUI Style Battery Bar for all ROMs | Better Guide by Geeky Android Tips
Hi guys this Shubham aka ThunderBolt. Many of you would have used MIUI if you're living in a country like India or China where Xiaomi is a major smart phone seller, and you've used it for some days, you may have noticed battery bar feature in it, which enables a battery bar on top of the status bar which looks real nice. But if you don't have MIUI in your device don't feel bad, because i'm going to tell you how to enable battery bar in your non-rooted battery bar which looks something like this:
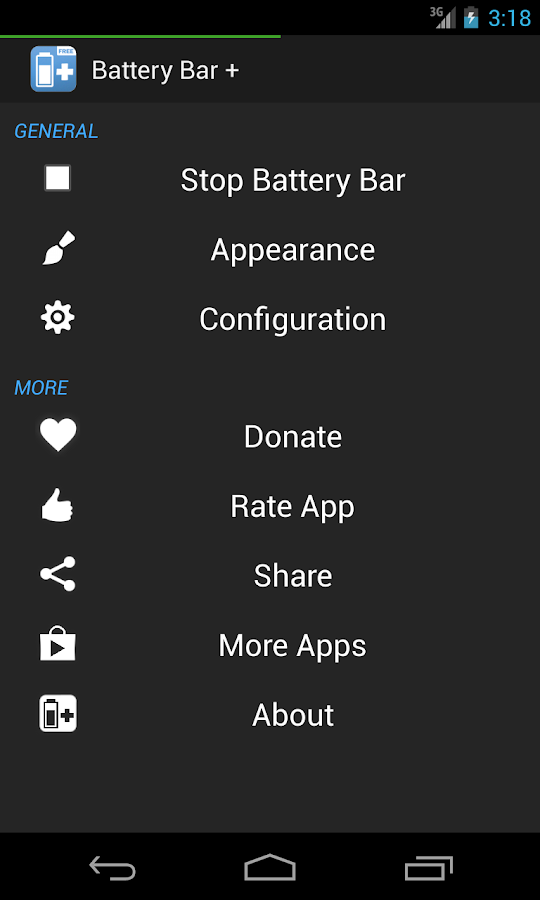
But if you don't like it, don't think that you are wasting your time, as there are many features for customizing the status bar using this app called, Battery Bar +.
It is very easy to use it, just open it and tap on run after configuring it( if you want to).
You can download this app either from play store or from here absolutely free:
Download Battery Bar APK
Well that's it for today guys, hope you like my posts, keep visiting Geeky Android Tips.
Feel free to leave suggestions and questions in the comments section.
Peace !
Tuesday, 18 August 2015
[NEWS] Android M stands for Marshmallow | New Android Staue Revealed | News by Geeky Android Tips
Hi guys this is Shubham aka ThunderBolt. Today Google will unveil the statue - and with it the name - of the newest version of Android. This fact has been teased by Google employee Jeff Sharkey then revealed by Google employee Dave Burke - and it's a strange one. Google has opted to have an original Android holding the marshmallow rather than turning the statue into an Android-ified marshmallow with white head and all. This can only mean one thing - the next version is going to be Nuts.

This version of Android has been being released to users in preview mode for the past several weeks. At this moment, Android Marshmallow is on preview version number 3 - with a new version well on its way. With a new statue already unveiled, we can expect the first full release of Android Marshmallow to be coming out within the next few weeks.
Hope you guys like my news, keep visiting GAT.
Feel free to leave suggestions and questions in the comments section.
Peace!

Hope you guys like my news, keep visiting GAT.
Feel free to leave suggestions and questions in the comments section.
Peace!
Monday, 3 August 2015
[UPDATED] Xposed for Android 5.1.x [WORKING] | Xposed Framework SDK 22 | Xposed Alpha 3.0 v4 APK | Xposed Bridge JAR file| Guide by Geeky Android Tips
Free Online Tech Support
TO DOWNLOAD THE LATEST XPOSED
VERSION GO TO THIS LINK
Hi guys this Shubham a.k.a ThunderBolt. If you have a rooted phone you may have probably heard about xposed framework, or you may have even used it, but if you have tried installing xposed in android lollipop, that is, 5.1.x, then you must have noticed that the Xposed Installer doesn't works, it shows that the SDK of lollipop is not supported. Well guys, today i will be your savior and will show you how to install xposed on your android device. Well first, as you know, you will need a rooted android device to install xposed framework, so continue only if your phone is rooted (see how to root). Now as you have root, you will need three things for installing xposed framework in lollipop:
Now let's come to the installation of Xposed, so first you need the following two files:
TO DOWNLOAD THE LATEST XPOSED
VERSION GO TO THIS LINK
Hi guys this Shubham a.k.a ThunderBolt. If you have a rooted phone you may have probably heard about xposed framework, or you may have even used it, but if you have tried installing xposed in android lollipop, that is, 5.1.x, then you must have noticed that the Xposed Installer doesn't works, it shows that the SDK of lollipop is not supported. Well guys, today i will be your savior and will show you how to install xposed on your android device. Well first, as you know, you will need a rooted android device to install xposed framework, so continue only if your phone is rooted (see how to root). Now as you have root, you will need three things for installing xposed framework in lollipop:
- Xposed Installer Alpha APP
- Xposed Framework Flashable Framework
- Xposed Bridge API
Now let's come to the installation of Xposed, so first you need the following two files:
- Xposed Framework ZIP ARM
- Xposed Framework ZIP ARM 64
- Xposed Framework ZIP x86
- Uninstaller ARM
- Uninstaller ARM 64
- Uninstaller x86
- Xposed Insaller Alpha APK
Well after downloading the required files (that is according to your proceesor) install the apk, and the reboot to recovery to install the framework zip file to install the framework, now when you'll go into xposed it will show you active bundles and xposed will be working. You can download it from my blog:
Xposed Brigde API JAR
Now after this, in most devices the xposed will not work properly, so you need to download Xposed Bridge and place it in /system/framework folder, to make xposed work properly.
NOTE: After this go to root explorer and long tap on this file, go to permissions, and allow it all permissions by checking all the boxes. You may reflash the zip file for better stability.
Well that's it for today guys, hope you like my posts.
Feel free to leave suggestions and questions in the comments section.
Peace!
Contact: lamabshubham@gmail.com
+91 7027398996 WhatsApp Only
Tuesday, 28 July 2015
Protect against WiFi Attacks | Secure your WiFi Connection | WiFi Tricks root | WiFi Proteector APK | Guide by Geeky Android Tips
Hi guys this Shubham a.k.a. ThunderBolt. We all use WiFi connection in our daily lives, and many of them are open so many devices are connected to it, which means that you and your device are not safe secure. Hackers can do many things like killing WiFi, accessing files, viewing passwords and many other things, but we can protect our device from such hackers using a root application, called WiFi Protector. So, dont wait and download and install it now.
Download Wifi Protector APK
When you're done downloading and intalling the app, open it give root access, after that the app will show you status:normal when nobody is trying to attack, but when it detects an attack it will either try to stop the attack or it will turn WiFi off, depending on the strength of the attack. Well just keep this app running and you're absolutely safe while connected to WiFi networks, especially the open ones.

Well that's it for today guys, hope you like my posts.
Feel free to leave questions and suggestions in the coments section.
Peace ✌!
Contact Geeky Android Tips: lambashubham@gmail.com
+91 9468-191-953 WhatsApp only.
IRGEEK.....................................................................
Download Wifi Protector APK
When you're done downloading and intalling the app, open it give root access, after that the app will show you status:normal when nobody is trying to attack, but when it detects an attack it will either try to stop the attack or it will turn WiFi off, depending on the strength of the attack. Well just keep this app running and you're absolutely safe while connected to WiFi networks, especially the open ones.
Well that's it for today guys, hope you like my posts.
Feel free to leave questions and suggestions in the coments section.
Peace ✌!
Contact Geeky Android Tips: lambashubham@gmail.com
+91 9468-191-953 WhatsApp only.
IRGEEK.....................................................................
Subscribe to:
Posts (Atom)